
In this post, I just want to show you some really cool things you can do when you’re editing your videos to make it easier and more efficient. Simply put, editing your videos like a BOSS!
How do you edit videos like a boss?
1. Record all the videos for your course
If you want to edit your videos like a pro, make sure that you have recorded all of your videos, your rough takes, and basically, your entire course. Ensure that you have these before you try to start editing or cleaning up your videos, so that it’s all ready and can be easily exported to an mp4 file and uploaded to a course platform, like Udemy.
Watch the video:
2. Use an editing tool you are comfortable with
I use Screenflow for Mac for all of my video editing. I do use Camtasia Studio at my corporate day job when creating video tutorials. Either one of these tools work great. They both have pretty much the same functionality. It’s just that the user interface is a little different.
I like using Screenflow for editing my course videos because, personally, I think the UI, or the interface, is much cleaner. There’s a lot less noise and distractions. Also, for me as a Mac user, it’s just more intuitive to use it.
3. Don’t try to get it all perfect in one take
When I record my videos, I used to try doing it and perfecting it all in one take. That’s a big, big no, no.
If you’re just getting started, you might find yourself doing it, and that’s okay. However, you have to catch yourself and remind yourself that doing so is not going to help you get your course out in the most efficient manner possible.
So, record all of your course videos and outtakes. Then, just take a pause if you screw up when you’re recording, so that you know where you need to cut out some frames. You can just edit out some of that dead space or white noise, and everything else that you don’t want in your video.
4. Take a deep breath and just edit out what you don’t want in your videos
Here’s an example of what I edit out in my course videos. Using Screenflow, I load up the video that I want to edit. Now, I can see that there’s just a long pause in the section of the video. I double-check it just to see if it really is just dead space where I’m also not doing anything.

It’s just a couple of seconds of downtime that I can cut out. Doing this will help reduce the amount of wait time my students will have to endure while watching the video. I just need to select the dead space section.

Then, I just need to cut it out and delete it.

Next, I’m going to select the audio and video bars, drag them across the space the deleted section left, and snap them right in to the previous section.
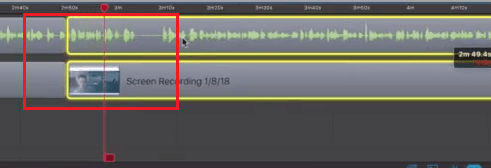
When you play the video, you won’t even notice it. It’s very subtle. You don’t even realize these edits when you’re watching videos.
5. You don’t need to hire video editors
In many cases, you don’t need to hire professional editors to do your video editing.
If you have the budget for it, then it may be the best use of your time to hire someone to do it for you. But, depending upon who you use, you can end up spending a significant amount of money before you’ve even made money on your course. So, I don’t recommend it.
I’m a big DIY fan. I do outsource and have a virtual assistant that helps me with content marketing, my blog, and content promotion. But, when it comes to my video editing, I do all that myself. When it comes to anything that has to do with the video creation process, I handle that.
However, you do have to look at your time and resources, and figure it out. Do you have the money to pay someone? If you do, then I guarantee you’re going to reduce the amount of time it takes for you to get content up and online.
But again, if you’re just building your first online course and you’re going to publish it on a course platform, then it would be best to save your money.
6. Instead, invest in a great tool
Invest in a license for Screenflow or Camtasia, and you won’t be disappointed.
Is there a learning curve? Yeah, absolutely. Anytime you DIY stuff, there would be a learning curve. There is a cost in anything.
But, its skills that you will have forever. Bootstrapping, I think, is just a very rewarding process and experience. Later on down the road, when you decide to outsource or build a team, then you’re going to know exactly what to look for and the quality of work you want them to provide.
Anyway, these are just some quick tips on how to edit your lesson videos. But seriously, get to recording and editing those videos, and get them out there.
Editing my lesson videos is actually the fun part for me. When all of my videos are recorded, I just hammer away at 2AM each morning, editing and exporting them into mp4 lesson files. When I’m done editing, I can then enjoy the process of bulk uploading my videos into my course platform, Udemy, to get it reviewed and published, so that I can start promoting it.
I hope this helps you with your editing and course creation process. If you have any comments or questions, go ahead and leave them in the comment box below. I’d love to hear from you.
Leave a Reply